Gutenberg Custom Block – Board Member
NOTE: This following was written December 2017 and many changes have been made to Gutenberg since then. Due to other large WordPress projects in my queue, I apologize that I do not have a planned update for this page at this time. This is a good read still, just know that the code below may not work as intended.
I am very excited about the Gutenberg project in WordPress. I think it will open the doors for many people who are new to creating websites. I have heard many developers talk about this change coming to WordPress core in version 5.0, some for it and some not. I know this will create work for existing plugins and themes to adapt, and some at great costs, but in the long run I think this will be an improvement worth the effort. So, in order to get myself prepared I have been trying to learn ReactJS and study the example set of blocks in the Gutenberg Handbook.
Background on my first Gutenberg Block
My first block attempt is to replace a plugin I created for the ARMA Greater Columbus Chapter website that adds a custom meta box and custom post type to create a Board Member listing. Of course I did not need a custom post type, as the website director could just as easily code the member bio into a standard post or page. What I wanted was a simple post type with all the required fields so that this person could create a consistent blob of information for all the Board Members and be able to save them separately to be used at a later date if as the members come off or back onto the board.
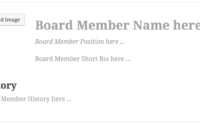
With Gutenberg, I was able to create a custom block that provides the consistent data entry for each board members bio. As of Gutenberg 1.9.1, we can now save a filled in block for use on other posts/pages or allow the website director to temporarily remove a board member block as that member comes off the board and then add them back in if they run for a seat again. You can see the how the block looks on the front end view to site visitors at my test Gutenberg Site (gutenberg.remejy.com)
Requirements
You will need to install the Gutenberg plugin to enable the new Gutenberg editor. I highly recommend not doing this on any live website as many themes and plugins will still need to be adapted to work with the new editor. As of the last I heard, when Gutenberg goes live in WordPress 5.0 then the plugin for the Classic Editor can be added while site owners and developers can prepare for the change. I am pleased with the decision to make Gutenberg the default, as if otherwise listed as an option then not many people will enable it. It is my opinion that this needs to move forward to improve the future of WordPress.
As of 12/23/2017, I am debating creating a Git repository (of which I have no familiarity, but willing to learn) for my Gutenberg blocks. But for now, you can create your own plugin to add my code below. There is also some good resources at the bottom of this article to learn more about Gutenberg.
The PHP portion
Yes, you still need to enqueue the styles and javascript for the block to work in WordPress. I did this by creating and activating my custom plugin. Add the following code to your plugins main php file.
add_action( 'enqueue_block_editor_assets', 'r3_gutenberg_boardmember_enqueue_block_editor_assets' );

function r3_gutenberg_boardmember_enqueue_block_editor_assets() {
 wp_enqueue_script(
 'r3-board-member',
 plugins_url( 'block.js', __FILE__ ),
 array( 'wp-blocks', 'wp-i18n', 'wp-element', 'underscore' ),
 filemtime( plugin_dir_path( __FILE__ ) . 'block.js' )
 );
}

add_action( 'enqueue_block_assets', 'r3_gutenberg_boardmember_enqueue_block_assets' );

function r3_gutenberg_boardmember_enqueue_block_assets() {
 wp_enqueue_style(
 'r3-board-member',
 plugins_url( 'style.css', __FILE__ ),
 array( 'wp-blocks' ),
 filemtime( plugin_dir_path( __FILE__ ) . 'style.css' )
 );
}
The first add action will enqueue the block.js file (see code below) once all of the Gutenberg required files are loaded. This will add my block to the block choices available in the Gutenberg editor mode. The second add action is not required but is recommended so as to move the styles out of the block descriptor file. This part of the process is probably the simplest task. Note, that the block.js and style.css files should be in the same directory as your plugins main php file.
The Block code
This is the more in-depth part. This version of the code is in a JavaScript format that most modern browsers will display. There is a newer version of JavaScript that many other blocks have been written in that has better features and cleaner code, but I will have to learn more about Babel and Webpack to convert the newer code to be readable by older browsers.
Add the following code to a new file and save as block.js
( function( blocks, i18n, element, __ ) {
 var el = element.createElement;
 var children = blocks.source.children;
 var attr = blocks.source.attr;

blocks.registerBlockType( 'r3-gutenberg-blocks/board-member', {
 title: i18n.__( 'R3: Board Member' ),
 icon: 'id-alt',
 category: 'layout',
 keywords: [ __( 'bio' ) ],
 attributes: {
 memberName: {
 type: 'array',
 source: 'children',
 selector: 'h2',
 },
 position: {
 type: 'array',
 source: 'children',
 selector: '.position',
 },
 mediaID: {
 type: 'number',
 },
 mediaURL: {
 type: 'string',
 source: 'attribute',
 selector: 'img',
 attribute: 'src',
 },
 memberBio: {
 type: 'array',
 source: 'children',
 selector: '.member-bio',
 },
 history: {
 type: 'array',
 source: 'children',
 selector: '.history',
 },
 },
 edit: function( props ) {
 var focusedEditable = props.focus ? props.focus.editable || 'memberName' : null;
 var attributes = props.attributes;
 var onSelectImage = ( media ) => {
 props.setAttributes( {
 mediaURL: media.url,
 mediaID: media.id,
 } );
 };

return (
 el( 'div', { className: props.className },
 el( 'div', { className: 'board-member-image' },
 el( blocks.MediaUploadButton, {
 buttonProps: {
 className: attributes.mediaID
 ? 'image-button'
 : 'components-button button button-large',
 },
 onSelect: onSelectImage,
 type: 'image',
 value: attributes.mediaID,
 },
 attributes.mediaID
 ? el( 'img', { src: attributes.mediaURL } )
 : 'Upload Image'
 ),
 ),
 el( 'div', { className: 'board-member-bio' },
 el( blocks.Editable, {
 tagName: 'h2',
 inline: true,
 placeholder: i18n.__( 'Board Member Name …' ),
 value: attributes.memberName,
 onChange: function( value ) {
 props.setAttributes( { memberName: value } );
 },
 focus: focusedEditable === 'memberName' ? focus : null,
 onFocus: function( focus ) {
 props.setFocus( _.extend( {}, focus, { editable: 'memberName' } ) );
 },
 } ),
 el( blocks.Editable, {
 tagName: 'div',
 placeholder: i18n.__( 'Board Position …' ),
 value: attributes.position,
 onChange: function( value ) {
 props.setAttributes( { position: value } );
 },
 focus: focusedEditable === 'position' ? focus : null,
 onFocus: function( focus ) {
 props.setFocus( _.extend( {}, focus, { editable: 'position' } ) );
 },
 className: 'position',
 } ),
 el( blocks.Editable, {
 tagName: 'div',
 placeholder: i18n.__( 'Board Member Bio …' ),
 value: attributes.memberBio,
 onChange: function( value ) {
 props.setAttributes( { memberBio: value } );
 },
 focus: focusedEditable === 'memberBio' ? focus : null,
 onFocus: function( focus ) {
 props.setFocus( _.extend( {}, focus, { editable: 'memberBio' } ) );
 },
 className: 'member-bio',
 } ),
 ),
 el( 'h3', { className: 'board-member-history' }, i18n.__( 'History' ) ),
 el( blocks.Editable, {
 tagName: 'div',
 placeholder: i18n.__( 'Board Members History …' ),
 value: attributes.history,
 onChange: function( value ) {
 props.setAttributes( { history: value } );
 },
 focus: focusedEditable === 'history' ? focus : null,
 onFocus: function( focus ) {
 props.setFocus( _.extend( {}, focus, { editable: 'history' } ) );
 },
 className: 'history',
 } ),
 )
 );
 },
 save: function( props ) {
 var attributes = props.attributes;

return (
 el( 'div', { className: props.className },
 attributes.mediaURL &&
 el( 'div', { className: 'board-member-image left alignleft' },
 el( 'img', { src: attributes.mediaURL } ),
 ),
 el( 'div', { className: 'board-member-bio' },
 el( 'h2', {}, attributes.memberName ),
 el( 'div', { className: 'position' }, attributes.position ),
 el( 'div', { className: 'member-bio' }, attributes.memberBio ),
 ),
 el( 'h3', { className: 'board-member-history' }, i18n.__( 'History' ) ),
 el( 'div', { className: 'history' }, attributes.history ),
 )
 );
 },
 } );

} )(
 window.wp.blocks,
 window.wp.i18n,
 window.wp.element,
 window._,
 );
As of 12/23/2017, I have not yet added comments to the code so it will be hard to describe what I have done. What I did was take the recipe-card sample from the Gutenberg Example by the Gutenberg team and edited to what I needed to make this work.
the registerBlockType function takes a block name and an JavaScript object that describes the block. In the object you will notice some properties like title, icon, category, attributes, edit and save. The attributes property is an object that details the data properties that belong to your block. For example, I have a data field called “memberName” which will hold the board members name. The properties for this field tell Gutenberg how to retrieve the information in the data for the post. In my example, Gutenberg will look for the h2 tag in the post and use what is between the tag as the data. Gutenberg accomplishes this by adding html comments around the block and this is saved to the database directly in the post. When a post is displayed, Gutenberg removes these comments before being displayed to the site visitor.
The edit property is a function the must return a grouping of elements to describe the editing display for the user that is editing the post. The layout of the editing elements should be close to how the information will look when displayed to a site visitor. This helps the editor of a post see how the block will look during edit mode. The el() functions in the return statement are references to a special createElement function that was setup at the beginning of the block code. Inside the el() function you describe either an html element and some properties or you pass in a special blocks.Editable composite element. the Editable element is a special block part that is defined by the Gutenberg plugin to provide an uniform editing experience that block developers can use that allows for predefined or custom toolbars to make editing easy and familiar to the post editor.
The save property is a function that must return a grouping of elements that will describe how the block looks after plugging in all the data from the attributes property. This is how the block will look when not selected in the post editing view and how it will look when displayed on the front end of the website.
Where to go from here
I know I need to work on adding comments to the code and sharing the code better than in this post directly. I should learn Git, so that might be a good place to drop the code. I do need to clean up some of the edit elements and add some descriptors that better help the person editing the post understand what is expected of them in edit mode. Probably just need some html label elements above each section that are not included in the save function.
Most of all, I need to setup Babel and Webpack and look at the Gutenberg plugin to see how their config files are setup. If you have not had a chance to learn about React, this would be a good time to start learning. There is a React InspectorControl element that I want to use, but I need to have a workflow setup that will convert the JavaScript written in ESNext format down to the ES5 format so more browsers can read the code.
Of course, while writing this post I have my thoughts in my head that may not come out exactly correct or comprehensible in writing. I will do my best to reread and edit this post for clarity as the days go on and I understand blocks better. I know just enough JavaScript to get myself into trouble and by no means an authority on Gutenberg blocks or proper programming in JavaScript. If you see something that I missed or needs corrected, by all means comment below. Please remember that I am a novice programmer who is just trying to show that almost anyone with the will can easily create their own blocks for Gutenberg. If you find a decent resource about this topic then please share below. I am still learning, as I am sure the rest of us are.
Happy programming and good luck!
Resources
Gutenberg Blocks – Board Member Block Written in JSX

Full Site Editing Template Part Deleted or Unavailable