VStar 650 Saddlebags from Viking Bags
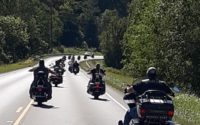
We are an extension of our bikes, so we must customize them as so. As I looked at what items would be an important addition to my ride, I realized that a simple backpack was far to inconvenient and insecure as having saddlebags. So after some research, I happened upon Viking Bags and reading their reviews, watching user videos and all the other great videos from Viking I thought I should give them my business.
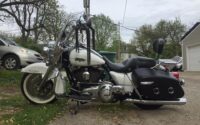
Picking out the bag I wanted was not as easy at first, as there are far many choices available. I narrowed down the look by realizing I did not want the studded look, I wanted them to be hard bags but with leather and they needed to follow the look of the fender. I liked the look of the Warrior series and the amount of space inside. Ordering the bags was simple, however I was slightly confused as to whether I needed to add the extra turn signal kit or if it indeed came with the bags. Since I did not want to find out that the kit was not included and stall the install process I went ahead and ordered the kit. Turns out, despite the fact that the website description was not 100% clear, the bags I choose did come with the turn signal relocation kit. I now have two sets, so I might give the extra to a friend or hold onto them if I make some other mods where the kit might come in handy. I am sure I can easily return the kit, but the price is good for what the kit includes so I might as well keep it.
The fulfillment of the order did take a few extra days longer than I was hoping, but I am sure that due to my order being placed in spring that the company was very busy with the number of possible orders coming their way from around the globe. The tracking number was provided to me via email and I was able to track the delivery of my bags with ease. The bags arrived and the contents were packaged adequately (which means there was plenty of plastic to protect the bags and the brackets in their own respective boxes inside).
I carefully read the instructions that came with the bags and the brackets. The instructions that came were not very useful in my opinion. Your best bet is to watch two videos that were created by Viking that show more detail on the installation process. The videos are linked on the bags page in the Installation section. There are also other videos Youtube that will give you some great guidelines for installation. The biggest decision I needed to make was whether I wanted to drill holes and hard mount the bags or just do the over the fender strap install. The bags come with great leather straps to install quickly over the fender and I am sure many people go this route. However, after I installed the brackets that keep the bags from hitting the wheel and installing the bags as a fender throw over I was not satisfied with how the bags could easily flop around in the wind. I prefer to have the bags not be mobile and stay in place without moving about as I ride, maybe it’s just a fear thing for me that something may go wrong and the bags cause me to have an accident. I choose to hard mount the bags to the bike.
I relocated the rear turn signals with the kit that came with the bag. The install was a little more extensive than I anticipated, mainly because I was not sure how to disconnect the rear brake light wiring so that I can run the turn signal wiring in the new bracket. After some research on the Yamaha parts website, I realized there were three screws up under the fender side that I needed to remove in order for me to remove the taillight assembly. Was not terribly difficult to remove the screws, but getting your arm up between the wheel and fender to reach in and reinstall the screws was a bit more challenging. If you have larger arms or hands, you might consider removing or loosening the fender first to make that process go smoother.
After the turn signals were relocated, I was then able to dry fit the saddle bag brackets and line up the bags on the bike using the throw over straps (I did not have a partner to help hold the bags while I stood back to look at how they lined up. I recommend having a partner). Once I liked how the bags were lined up, I marked the backside of one bag where the bracket holes lined up. I drilled four holes and then placed the one bag on top of the other so they were back to back and marked the second bag by reaching inside the first and using a marker to mark the second through the holes in the first. See the installation video I found on Youtube that shows this process very well at minute 4:00.
Once the bags were marked and drilled, I installed the brackets to the bags and then to the bike. I think everything went well and they definitely look good. While it did take me two separate days of about 6 hours each (I am a bit slow at mechanical work), I did get them installed fairly quickly for my abilities and they have come in handy on many trips. I am very excited that I did this all on my own and the bags have become such a necessity that I can not imagine not having them.